Friday, December 25, 2015

Fixing Login on Xiaomi Mi Band 2

This will be a fairly short post. I just wanted to get this out there in case others are working on this over Christmas. I may update this later as things progress. This all occurred yesterday 12/24/2015.

My mother received a mi band 2 for Christmas this year, and I was tasked with setting it up. I downloaded the latest version of mifit (version 1.8.111) and followed the setup procedure. I created an account using an email address and logged into google when prompted.

I tried multiple times, but it always gave an error - either "error 96103" or "invalid email address".


What worked for me...

1) Uninstall the most recent app.
2) Download an older version of the app. I used version 1.3.412 found HERE, but I cannot vouch for its safety apart from not receiving any obvious damage.
3) Transfer this file to the phone (or download it on the phone) and click on it. I used ES Filer Explorer for this.
4) Run this file. On ES File Explorer just navigate to the file, tap it, and select install. Here you may be required to turn off a security setting or two. Do this at your own risk. I would recommend turning it back on when you're done.
5) Follow the setup procedure and create an account. You will be required to put in a phone number and an email address.
6) Uninstall the old version.
7) Reinstall the current version and log in with the account you created.
8) Enjoy your mi band and comment on this page how the process went.

What I suspect will also work...

Just create an account using a phone number. The older version of the app requires a phone number to create the account. This leads me to believe just using the most recent app and selecting "create account with phone number" (or something like that) might also work.

If this works please comment on this post, so others will know. If you know of any other fixes please mention them there as well.

What didn't work - but could be tried again...

I tried using this link on a laptop. This did not work. It gave me the page below.


I hope this helps. Merry Christmas!
-Matthew 

Sunday, December 6, 2015

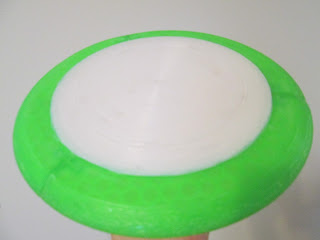
3D Printed Disc Golf Disc

Disclaimer

I will begin by saying, if you are thinking about printed a disc golf disc to get into disc golf, don't. Go buy a nice 165g dx shark online for $10 and know exactly how its going to fly when you take it out of the plastic. With that said, this was an interesting proof of concept that might be fun for others to attempt. If you had better filament materials, I believe it could be possible to print a fairly useful disc.


Intro

I originally used my X-out KC Pro Roc as a pattern for what my disc should look like. Taking measurements off of  the disc directly as well as using dimensions from the PDGA list of approved discs I was able to get a model of something that looked pretty close to the Roc. From the dimensions of my Prusa i3 print bed I decided that I would split the rim into thirds and then a single piece central domed flightplate.

This first disc I designed was quite naturally perfect; it was a work of art, flawless, sublime. A triumph equaled only by its monumental failure. The inevitability of its doom is as apparent to me now as a consequence of the imperfection inherent in every FDM 3D printer.Thus I redesigned it based on my printer's capabilities to more accurately reflect the varying grotesqueries of a 3D printed object. However, I was again frustrated by failure. I have since come to understand that the answer eluded me because it required a less typical design, or perhaps a design less bound by the parameters of perfection..

But seriously, when I did some initial prints of the profile based off the KC Roc, it didn't go very well. My printer did not handle the overhangs very well, and I did not want to go with support material as I didn't want to mess up the surface finish. I then started editing the profile until I got something that would both fit on my printer and print with fairly clean overhangs. The main thing that suffers from this is the dome top. In order to have a flat surface to print the rims on and have a flight plate still fit on my build plate, there is about an inch section where the disc is flat on top before the dome of the flight plate begins. I imagine this decreases the lift it creates. My final design I deemed the TTU Roc.


Construction

The final design can be downloaded from Thingiverse HERE. Construction is as follows.

Print 3 of the file TTURocRim_120C.stl . I used settings:

Layer Height: 0.1mm
Perimeters: 4
Infill: 25%
Combine Infill every: 2 layers
Support: Off

Print 1 of the file FlightPlateC.stl. I used settings:

Layer Height: 0.2mm
Perimeters: 4
Infill: 30%
Combine Infill every: 1 layers
Support: On

Next you will need to drill out the holes for the filament splints. These are the holes in the ends of the rim pieces that splint the 3 pieces together. I used plain 1.75mm filament to do this. Just drill them out so that they are an easy fit.

Now it is time to glue the disc together. I used super glue, and it is what I would recommend. This took me an hour or so of gluing in stages. If you know how to friction weld you might try that here. Really, join them however you want.

Next I applied some DIY plastic rivets. Drill 1.75mm holes through the bottom of the rim into the flight plate. Then glue in the filament, snip it off, and and sand it down to level. This was just something else I did to try to strengthen the joints between the flight plate and the rim. Use as many of them as you see fit. I imagine you could also use friction based rivets if you are comfortable with that.


Finally, sand the disc smooth and finish it however you want. I sanded it fairly smooth and then did a light coat of acetone to smooth it out some. Use whatever finishing techniques you have.


Performance

My final disc weight came out to 156 grams. I consider that an acceptable weight. Overall, the disc flew surprisingly well. To my amateur eye, it flies similar to a Roc. It appears to be a little slower and have less glide. Honestly, I haven't thrown it that many times for fear it will rip apart in my hand. I also doubt it will "beat in" very well. As ABS is pretty hard I imagine it would just break if it hit a tree. It also is not terribly comfortable in my hand. It is too hard and scratchy. In conclusion I made this chart to compare 3d printed disc golf discs of today to traditional discs.

3D Printed Disc Golf Discs:
Pro:
  • Infinitely customizable
  • Expose new players to the game 
  • Fun!
Con:
  • Lack consistency
  • Brittle materials
  • Poor surface finish
  • Made of joined parts 
-Matthew

Again, download CAD files HERE.


Saturday, May 16, 2015

Reprap 3D Printing Toolkit

I wanted to take a few minutes to compile a list of a few useful tools for RepRap 3D printing. I do this because I have been fortunate enough to learn a lot about the tools of the trade from people at school and various other sources, but others may not be that fortunate. I know that there are many other lists of this sort out there, but I will trust the magic of Google to take you to those posts if they are more relevant than mine.

Tools


Hairspray
A friend at school that is very experienced with 3D printing recommended Garnier Fructis Style Natural Hairspray. Strength of 4 or 5 works well. I haven't had too many issues with ABS not sticking when using this. Purple Elmer's Glue stick is also a popular bed treatment, but I have not tried that yet.

Giftcard
This is my trusty iTunes giftcard that I use to pry parts off of the build plate and scrape the plate clean. Any credit card will work, or you could spring for an epoxy spreader.

Screwdrivers
I use a small philips screwdriver to adjust my bed level and change filament. It is one of the few real tools I need unless I am doing serious modifications or repair.

Mini Needle Nose Pliers
I use these to clean off the nozzle just before a part prints. I basically use them to grab anything near something hot.

Acetone
This is a must for printing with ABS. ABS dissolves with acetone. I brush it on to polish parts (too lazy for vapor polishing) and use it to clean the nozzle and seperate fingers glued together. Note that some nail polish remover contains acetone, but I use a bottle from the paint department.

Super Glue (CA)
Plastic glues very well. Printing primarily in ABS, I find that cracks happen. Usually they can be repaired with at drop of CA. While I know from my RC airplane days that there are different thicknesses and even glue with an external hardener, those are more expensive. I use the cheapest stuff walmart sells and it works fine.

Kapton Tape
High temperature electrical tape. This stuff is pretty pricey, but you will likely need some for something. The small roll in the picture came with my Replikeo printer kit. 

Calipers
An all around must have for any aspiring engineer (in my opinion). I use it to calibrate extruder steps, measure parts when drawing them in CAD, verify printed part dimensions, and basically every other linear measurement less than 6 inches. These are fairly cheap ones from Harbor Freight. They work, but I doubt you will regret buying a decent pair from somewhere else.

Test Prints


Overhang Tests

Overhang Test print

Websites

  • RepRap Wiki - The official wiki of the RepRap Project
  • Thingiverse - Run by Makerbot. An archive of CAD models for 3D printing. If you want to make something, search here first to see if someone has already made it.
  • Youmagine - A thingiverse competitor that has sprung up. Some people don't use thingiverse for a variety of reasons. This is another good resource.
  • RichRap Blog - This is a blog that I have personally found useful. He has covered many useful topics over the years.
  • Projects From Tech - A nice blog of generally useful information
  • Google - If at first you don't succeed, Google the problem and find out why.

There are always more tools and test prints out there, but this post is long enough. If you know of any other must have items feel free to comment. I will be interested to see them.

-Matthew

Saturday, March 14, 2015

Replikeo Prusa i3 Rework Build - Part 4: Initial Prints and Modifications

This is Part 4 of my Replikeo Prusa i3 build account. This post will cover the initial modifications I made to the printer, how they effected print quality, issues I had with those modifications, and work for the future. It will also feature pictures of first prints and tests because I think those are obligatory when writing about a RepRap 3D printer. If you are interested in my other posts on this topic:

Printer Modifications

Board Mount
In my mind, the single most important upgrade I made to my printer was to mount it to a plywood board. This allows me move the printer easier without getting it out of alignment or level. It gave me a place to mount the PSU and several of the other upgrades I will discuss.


The board is 3/4" oak plywood, but any sort of plywood would likely work (just make sure it is flat). The board is 20.25" x 22.5" . I mounted it with 1/2" pipe mounting clamps from Home Depot as shown in the picture. I used 8 of them, and it is rock solid. The corners never get loose, and I don't worry about it shifting when I put it in my car or rotate it on my work table. On the bottom I used some no skid rubber feet also from Home Depot. It keeps the vibration down and makes it feel very steady.


Filament Spool Holder
This was actually the first modification I made to the printer. I quickly got tired of having to manually unwind printer filament. It is a combination of parts almost identical to THIS blog post.


This spool holder actually did work pretty well. It would probably work better if you used real 608 bearings. I eventually abandoned the OSFA spool holder and just hung it on the rod. That actually works better for me. Another note, the spool mount limits the z-height on the printer as the stepper hits the mount. It needs to be a little thinner. At some point I will get around to fixing it. It is also worth noting that without the z-axis support (next mod), this spool holder causes the z axis to bend over slightly. This causes the nozzle to raise off the build plate. This means when you put a heavier spool on the holder the nozzle gets pulled off the plate more. Not ideal. Overall I would recommend this setup, but if you have something better, go for it.

Z Axis Support
Downloadable HERE this modification supports the z axis so that it doesn't rock during the print. It bolts right on to the back of the z axis rod supports at top of the frame and screws into the plywood board. It requires 2 each of the printed parts and one 5/16" x 36" threaded rod cut in half. It works great. I highly recommend an upgrade like this.


PSU Mount
This is not so much about performance as it is convenience. I drew up a PSU mount in CAD for the PSU that comes with the Replikeo kit. A couple screws and some zipties and the PSU is firmly mounted to the plywood board. Now the printer is one unit that can be carried or put in a car without worry. Get the printed parts HERE.


Power Switch
I was going to wire up a fancy power switch on my printer, so I would not have to unplug it all the time. Then I realized I could just get a cheap surge protector and use that instead. I think I got a 2-pack for $6. Worth it in my mind.

X Axis Belt Tensioner
There are a couple of these drop in replacement x idlers that add tensioners. I liked THIS one the best. It went on with no problems. Now I can tweak the x axis tension however I want. This probably isn't a high priority upgrade, but it is something that I changed.


Z Axis Adjustable Endstop
THIS upgrade has been very helpful in tuning the printer. It allows me to change the endstop location with the turn of a screwdriver. It is a little flaky having the screw hit the limit switch arm. Someday I plan to put a larger pad on the end of the screw so that it hits more uniformly, but it works for now. I printed the tall version and snapped off the bits I didn't need with some wire cutters.


Print Cooling Fan
I use THIS cooling fan setup and it works great. I highly recommend that you shell out the extra $2 and get a centripetal fan. This fan setup blows more air than I need.It blows air right across the nozzle, so I had to wrap a little insulation around the extruder block to keep the temperature from fluctuating too much when the fan comes on. Possibly against common practice, I use it both on PLA and sometimes ABS depending on what I am printing and what other settings I am using. See the next mod as well.


Dual Fan Mount
THIS clips onto the Wade's extruder body that comes in the Replikeo kit where the fan would go and allows you to mount two fans. That means you can keep your current extruder cooling fan and also use a print cooling fan like above. If you are going to add a fan, it works great for me.


That is all of the modifications I have made to my Replikeo Prusa i3 printer thus far. To me, I would consider the first 5 "must have" improvements. They just improve the performance or convenience of the printer so much that they are definitely worth your consideration. If you have any other improvements you recommend, let us know in the comments. Now the obligatory first prints I promised.

First Prints

These are some of my first prints. The green is Hatchbox PLA. The white is the ABS that came with the kit. They are printed at various temperatures and layer heights using hairspray as the bed adhesive.
First ever prints. Learned the importance of bed prep right off the bat

Switched to the included ABS

Printed a few replacement parts

While I could post plenty more pictures I'd say this post is about long enough. If you want to see more, check out some of my other posts under the 3D printing tag to the right. If you have any questions or comments feel free to post below.

-Matthew


Tuesday, March 10, 2015

Fixing Autoscroll in GNU Octave for Windows

Introduction
A quick and dirty post documenting an Octave "fix" for a problem I was having. Running GNU Octave version 3.8.2-5 from MXE installer found HERE on a Windows 7 64 bit PC on 3/10/2015.

The Problem

The output of GNU Octave as installed above has a feature that while I am sure is useful to some, is quite irritating to me. Outputs that are too long to fit on the screen of the terminal are paginated. It will display the values that will fit on the screen and then wait for you to press "f" to see the next page worth's of data. See below. It displays "-- less -- (f)oward, (b)ack, (q)uit" at the end of each page.

While this may be great if you want to see every single value, if you are running long programs where the output is mostly for debugging purposes or similar, this can be irritating. I finally decided to figure out how to change this. Here it is.


A Solution

While I don't claim to understand exactly what is going on above, it is clear that the "pager" being used on my install is "less". I wanted to change it to "more".

1) Check what pager you are using - Type "PAGER()". My guess is it will probably be "less". 

2) View help file on PAGER() - Type "help PAGER". A couple useful websites: Documentation from a German university and Documentation on the Octave Wiki.

3) Change pager to "more" - Type "PAGER("more")

This should make the output look like the picture below. As you can see it scrolled through my entire output just fine. I will note that "PAGER()" now returns "more". Honestly, I don't really know what I changed under the hood, but it worked. Also note that it will reset when you reopen Octave.


That is all I have on this. If anyone has a more detailed explanation of how this works or other ways to fix this "problem" feel free to post in the comments.
-Matthew

Thursday, March 5, 2015

Serial Port Communication with GNU Octave in Windows

This is not so much a finished post as it is a place to record progress. Use any information found on this page at your own risk.

Introduction

I have been using GNU Octave in place of MATLAB on my laptop for a while now. It is free and serves my purposes well. One place MATLAB does have it beat though is in its ability to communicate with outside hardware through a serial port. I recently needed this functionality for Octave. This is how I made it work. My configuration:
  • Windows 7 - 64 bit
  • GNU Octave 3.8.2-5 using MXE installer
  • Instrument Control Package 0.2.1

Walkthrough

Install Octave

If you found this post I will assume you are probably running Windows. There is a convenient unoffical installer for Windows HERE. At the time of this writing I am running 3.8.2-5. Anything greater than 3.8.0 has the nice MATLAB style GUI.

Install Instrument Control Package

The equivalent of MATLAB toolboxes are packages in Octave. You need the instrument-control package to access the serial ports. There are two ways to install it.

1) Install it from Octave forge. Assuming you have an internet connection, open Octave and type in the command window "pkg install -forge instrument-control-0.2.1.tar.gz" Replace the 0.2.1 with the newest version of the package.

2) Download it from HERE. Assuming you did a standard install, move it to the folder "C:/Octave/Octave-3.8.2/src". There you will find all the other packages that were included with the installer. Now open Octave and make that folder your directory. Type in the command window "pkg install instrument-control-0.2.1.tar.gz". Obviously you may need to change the name of the package if you download a newer version.

Both options will take a while. One of my first mistakes was thinking I had crashed my computer. I wasn't sure if it would work on Windows, so when it just sat there for a minute I thought it was hung. Just give it some time. Mine took a couple minutes. 

Load Instrument Control Package

You only have to install the package once, but you need to load it every time you open Octave (you can also set it to auto load. Google it.)

Type "pkg list" to see all your installed packages. If you don't see instrument-control then you need to go back to the last step. Any package with an * by it is loaded.

To load the package type "pkg load instrument-control". Now load the list of packages again to see if it worked.

Use the Package

Now the part you have been waiting for. It is important to note that at the time of this writing the instrument control package is not a drop in replacement for the serial capabilities of MATLAB. Here are some helpful links to illustrate this. It is fairly obvious that the function names are different or missing for Octave.
For my initial test I used an Arduino with a jumper between Rx and Tx. This essentially mirrored anything I sent back to me. To simplify things, go to the device manager and change the serial port number to COM1 through COM8. Over that and additional work is needed. Device Manager > your port > Port Settings > Advanced > COM Port Number.

My Additions
To better serve my needs I added a few files to make the package more MATLAB compatible. Just make sure they are in your path somewhere if you want to use them.

srl_fwrite: Download HERE. Similar to the MATLAB fwrite. The regular srl_write only accepts char and uint8s. I made this function to simplify sending other variable types. Accepts three inputs 
  • Serial Object
  • Data to be sent
  • Data Type - int8, uint8, int16, uint16, int32, uint32, int64, or uint64
srl_fread: Download HERE. Similar to MATLAB fread. Reads serial port and returns data type specified. Takes three inputs.
  • Serial Object
  • Number of values to be returned. (eg for 3 uint64s, enter 3 not 24)
  • Data Type - int8, uint8, int16, uint16, int32, uint32, int64, or uint64

Test Script
Test Script: This script was taken and modified from the wiki linked above. It opens a serial port, sends a couple values and then attempts to read them when the serial device mirrors them back. A "correct" output should look something like this.

Serial: Supported
s1 = 0x444
int8 = 200
intdata =

    0  142    1   44


That is all I have at the moment. I hope this tutorial was useful to someone out there. I plan to do another post on the way I am actually using this capability in the future as a more in depth example. 

-Matthew

Sunday, February 22, 2015

Replikeo Prusa i3 Rework Build - Part 3: Wiring and Software Setup

Part 3 will cover my wiring of the Replikeo Prusa i3 Rework (mostly following the wiki page). Then I will cover my setup of the Repetier Firmware. I'll save first prints for Part 4. If you are interested in the unboxing and assembly see Part 1 and Part 2 respectively.

Wiring

"Completed" Wiring

As the wiki page already has a very complete set of instructions on wiring, I will refrain from giving a step-by-step description of the procedure. I will instead clarify a few points that caused me a bit of confusion or could cause confusion.

1) The Arduino does indeed mount in the holes shown on the wiki page. The USB port points down. I initially could not manage to get the holes lined up, but they eventually cooperated.

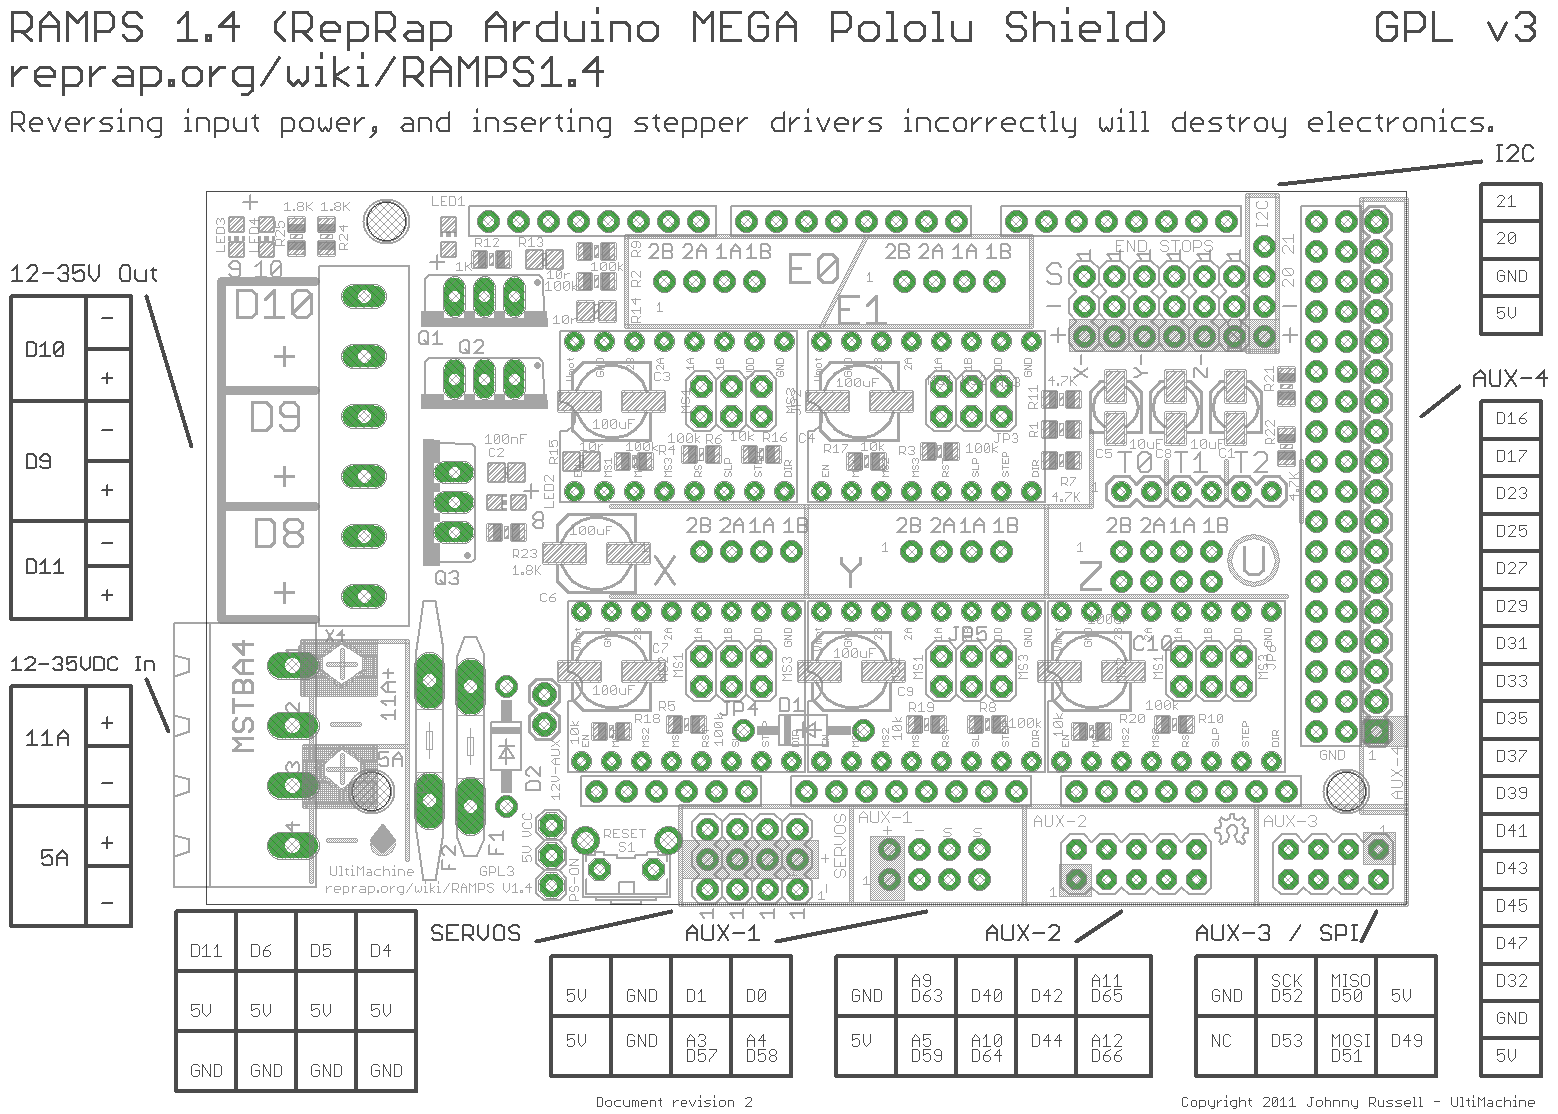
2) The endstops as wired in the picture are connected to the min endstop pin. That doesn't really matter right now, but you will need to know that when you go to setup the firmware.

3) On the power supply L=Line, N=Neutral, and G= Ground. I used a multimeter to find out which wire goes to which pin. If you live in Tennessee you should have about 120 VAC across the line and neutral. Be sure you change the switch on the power supply to 110V mode.

4) When wiring the motors you can plug both Z motors into the ramps board. There are (quite conveniently) two headers there. You don't have to have an external combining pcb as shown in the picture on the wiki.

5) I used the fan that came with the Replikeo kit as an extruder cooling fan, not a "Print Fan". As such, I did not connect it to D9. This required that I crimp on an old servo connector I had to attach it to the extruder fan pins. These are just a 12V breakout. Whenever you plug your printer in, it is going to come on.

Ramps 1.4 Pinout

 Software

I am using the Repetier Firmware with Repetier Host and Slic3r. Repetier has a very convenient web setup tool. It really wasn't all that difficult and was pretty helpful in figuring out how things worked, but if you are having problems and want to try the firmware I am using download mine HERE. Just upload the configuration.h file and see what's going on. One thing to remember, some of the settings may be getting set in EEPROM. This means you will need to update them from Repetier Host. It's under the Config tab. 

In Repetier Host, be sure to input all the correct Printer Settings. For instance I have a max x endstop and the other two are mins. And my bed is actually 190x170. If you follow the installation instructions on Repetier's website you should be fine.

In Slic3r for the ABS that was included with the kit a lot of the default settings work fairly well. For the filament settings my diameter measured to be about 1.73mm and I print at 230 for the first layer and 215 for the rest. Bed is at 100. I also had some success starting the bed at 100 then dropping it to 85. I have not been able to calibrate the thermistor yet, so I can't be verify that those are the actual temperatures. But those settings work for me.

Now the fun part begins, You get to go play and test things. I doubt very many people will read this and use it as a guide to assembling their printers. However, if you are trying to decide if this is the printer for you, I can confirm that the wiring and software is equally simple. A few hours and I had it working.

That's all for part 3. In part 4 I will show some pictures of my "completed" printer and the modifications I made. Some of them are good. Some of them still require work.

-Matthew

Friday, January 2, 2015

Replikeo Prusa i3 Rework Build - Part 2: Assembly

Part 2 will describe the process of building my Replikeo Prusa i3 Rework. Having already taken inventory in part 1, I will continue following the wiki instructions with Y-axis assembly. Below are the pictures from the build.

Y axis assembly

Y axis assembly with carriage

X and Y axis assemblies

X, Y, and Z axis assemblies

Z Steppers added

Attach uprights to base and add X,Y steppers

I don't remember having any serious problems with this portion of the build. I was able to put what you see above together in a few hours. Some screws were too long as I had seen documented elsewhere. I just put some extra washers underneath them. On the z-axis threaded rods, the nuts did not fit snuggly into their housings, so I added a drop of hot glue to each. Other than that, I pretty much followed the instructions. Next was the extruder assembly.

The extruder assembly required a little teasing. It is worth noting that this is the only printed part that is included in the kit. As such, some trimming of support material was required. I was not overly impressed by the print quality. I plan to print a replacement at some point and expect mine to come out much better. The biggest problem was that the hole for the j-head was not round. Luckily the j-head is almost exactly the same diameter as the drum sander attachment on a dremel tool. A bit of sanding and it was good to go. Below are some pictures.

Assembly before stepper

J-head hole enlarged
Hot glue added to keep bearing in place

Fully assembled extruder before stepper

At this point the only things left to do were add the heated bed and wire everything up. Wiring will be in part 3, but I will put the heated bed pictures here. I debated for a while how to best attach the thermistor. Eventually I ended up using silicone sealant and some kapton tape I had. The wide kapton was not included in the kit, but many smaller pieces of the stuff included in the kit could be used if that is all you have. In the end, the silicone did nothing. I would just leave that off.
Thermistor included in the kit. Wires are presoldered and heatshrinked

Thermistor taped to heatbed

Printer ready to be wired
Its worth noting that I used springs to support the heated bed instead of washers like in the wiki instructions. I think it's fairly obvious how to do this; the springs are included in the kit.

At this point the only wiki page left is Electronics and Wiring. Part 3 will address wiring and initial software setup.

-Matthew


Thursday, January 1, 2015

Replikeo Prusa i3 Rework Build - Part 1: Unboxing

About a month ago I decided to build a 3D printer. This only left me with the task of deciding what kind of printer to build. While I had dealt with the Makerbot we have at school, I did not want to shell out that kind of money for a prebuilt, so I decided to go the RepRap route. After consulting with a friend that has a RepRap and searching around online, I came up with a few options to decide between.

Eventually those options narrowed to two. I would either build an OB1.4 printer. Or I would buy a full Prusa i3 rework kit. With Christmas break fast approaching and not wanting to forget a screw and have to wait until next semester I decided to go with the full kit from Replikeo. At the time I couldn't find too many reviews on it, so I decided now that I have it up and running I would post a few things about how it went. I would encourage others that buy the printer to do the same.


Long Story - Short 

I would recommend this kit to anyone with a little electronics and mechanical knowledge (the basic knowledge needed to build any RepRap). I got it up and running in about 4 days. Maybe 25ish hours. While I have some improvements planned, it had everything I needed to get it going. I really like the injection molded parts. The electronics look genuine. I am glad I purchased the kit instead of sourcing my own.

Long Story - Long

I ordered the "iron" 1.75mm Replikeo kit for $350. Shipping from wherever to my house in Southern Tennessee (USA) was $90. Addtionally I ordered $23 of Hatchbox PLA filament from Amazon and a Full Graphic Smart Controller from Ebay for $25. Everything came for less than $500. 

Shipping took exactly how long they said it would. 3-5 days via DHL. I think I got mine in 5 days including a weekend. Mine was not beaten up like another post I saw. I was irritated that there was no parts list but HERE is the wiki page. Now here are some unboxing pictures.
All my purchases together. Replikeo box is one the right.
Removed from the cardboard
Top removed exposing the frame
Steppers and Power Supply
ABS filament, electronics (in cardboard box), and rods protected below.
Threaded rods and smooth rods protected in packaging

I thought this was interesting. Apparently this kit was made just for me (that is my name).
Hardware and Electronics removed.
Electronics in anti-static packaging
All small parts laid out.

After getting it unboxed I took inventory of all the parts. While I did not bother to count all the small screws I estimated that I had enough of each. All the electronics were included. The one thing I would recommend is getting a longer USB A-> B Cable. The one included is tiny and inconvenient. I had one sitting around from my Arduino projects. The Arduino appears to be a "real" Arduino (or else a pretty good clone).

The injection molded parts are really nice. I don't see any of them breaking anytime soon, and it makes assembly very easy. While I would probably have used higher gauge wire on some components I am more or less pleased with it. The heated bed works well and the carbon fiber build plate is working well so far.

That is all I have for the unboxing section. Look for the next part (HERE) soon when I post pictures of the build.

-Matthew